After years in the disaster cleanup and recovery industry, there’s one thing we know for sure: A little preventative maintenance now can go a long way in stopping water damage to your property later. Oftentimes a simple checkbox on the to do list, like changing a filter or tuning up a backup generator, can make the difference between costly disaster and business as usual.
One such small task is testing your sump pump. Once you know how to test a sump pump, it takes less than five minutes to prevent flooding and water damage from ever reaching your property. Here’s what you need to know.
What Does a Sump Pump Do?
Sump pumps are pieces of mechanical equipment found at the lowest point in a structure that protect the space from water damage by moving water from under the foundation, within crawlspaces and in basements out to a place far from the building.
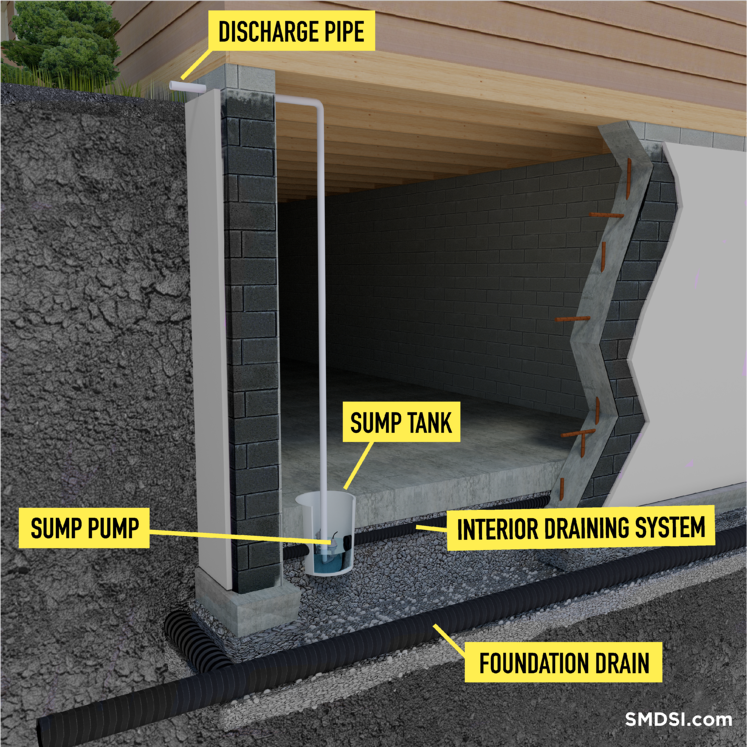
When water is moved away via the sump pump, it should be transported as far as possible from the property. Sump pumps are often triggered by heavy rain, meaning groundwater levels are high and natural drainage cannot handle the flow. Many buildings are rigged so that pipes dump water close to the foundation, sending it right back to the sump pump. Water should be displaced at a lengthy distance, as far away as possible.
Not every building has a sump pump, but they are most often found in structures that regularly experience heavy rain, a snowy season and/or a location near a large body of water. They are almost always found in basements or lower levels. If your building has a basement, it should have a sump pump, too.
Your sump pump is the unsung hero that doesn’t get enough credit for its critical role in water damage prevention. While sump pumps usually activate when precipitation falls all at once, they can also perform regular water removal as moisture builds up under your foundation. Without them, water would accumulate and stand in basements, ruining possessions and bringing the risk of mold, pests and structural damage.
When Should You Test Your Sump Pump?
At minimum, you should test your sump pump twice per year, right before the calendar hits both spring and fall. Both seasons are notorious for weather events that cause an increase in precipitation, but spring also carries with it the risk of flooding from melting snow and ice.
To be on the safe side, it’s recommended you test your sump pump more often than twice per year. After all, water damage can strike unexpectedly no matter the season. A great tip is to take a regular ballpoint pen or non-toxic marker and scrawl a note to yourself to test the sump pump on each of your furnace filters you have stockpiled. Assuming you change your filter on the usually recommended regular schedule of every two months, you will see the reminder and test your sump pump at the same frequency.
Of course, you can also add sump pump testing to your facility’s regular maintenance schedule, but if you don’t have a documented maintenance schedule or team, the note to your future self is a fun alternative. Plus, it only takes five minutes or so to test your sump pump, so performing the test and changing your filter gives you the chance to check two simple maintenance tasks off your task list.
It is also recommended you use the “every two months or more” schedule for testing when your sump pump is over ten years of age. The pump should last more than a decade, but expected lifespan depends on how often it runs and how much dirt and debris the water that moves through it contains. The dirtier the water and older the pump, the more often you should test.
How to Test a Sump Pump
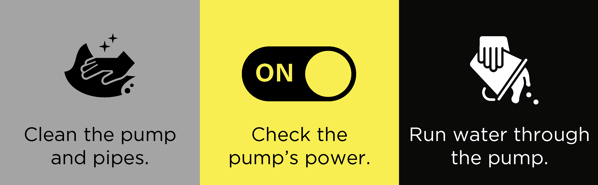
There are three simple steps to testing your sump pump.
- Clean the pump and pipes
- Check the pump’s power
- Run water through the pump
Clean the Sump Pump
The first thing you should do is check that your pipes are clean and in working order. Start on the outside of the building and ensure the area around the pipe is clean. Then check the pipe itself and remove any debris from the external pipes to avoid clogs. Areas that experience winter weather may have to perform more extensive checks, especially when snow and ice build-up are present.
Next, go inside and find your sump pump, usually in the basement or mechanical room, and remove the lid. Perform the same check on the pipes, removing any debris. Then, clean the inside of the sump pump and remove any dirt and debris from dirty water. Always use gloves to clean your sump pump!
Check Sump Pump Power
Once the sump pump is clean, check that the power is still functioning without issue. Sump pumps typically have two cords, one to power the float, and one to power the pump. The pump cord is plugged into the back of the float cord. Not all pumps have this structure, so consult the manufacturer or manual on checking power if necessary.
If your pump does have a typical structure with two cords, detach them and plug in only the pump cord, leaving the float cord unplugged, and make sure you can hear the pump motor running. If so, reconnect the cords, then plug everything back into the wall outlet as you found it.
Pour Water into the Sump Pump
Next, get a five gallon bucket filled with water. We recommend collecting the water from excess rainwater for an environmentally friendly way to test your pump, but any water free of dirt and debris will do.
you pour in your water, the most important thing to know is that sump pumps usually operate on a float system, like a toilet. Once the water level hits the float mechanism, the pump activates, pumping water out and away from the building. With this in mind, pour around half of the water into the sump pump, or enough to hit the height of the float mechanism.
Once the float is triggered, the pump should immediately start to work, lowering the water level in the sump pump “pit.” If the motor does not kick on and the water level stays the same, assume the test has failed and you are experiencing sump pump problems. If this happens, call a professional plumber immediately for assistance. This is not something you should put off, as the water level will continue to rise without being pumped out and cause a flood in the immediate area.
Additionally, make sure the motor stops working after the water is pumped out. If it continues running without water to pump, you can also assume the test has failed and call for assistance as soon as possible. A motor running nonstop with nothing to pump can quietly burn out in a best case scenario and cause a fire in a worst case scenario.
If the pump activates, drains the water and then stops as normal, pause and then repeat the test once more with the remaining water. A pump that performs correctly twice is a pump that has passed the test with flying colors. Note that in some sump pumps water level will rise just slightly after the pump stops. This is normal and nothing to be concerned about, as long as all the water that was just pumped out does not quickly drain back into the sump pump.
In some cases, you may not be able to pour water into the pump to perform this test. If this is true for you, you can instead lift the float mechanism or perform the action required to activate it. A properly activated float should trigger the motor, which you can take as a sign that your sump pump is working. Do not keep the float lifted for longer than a few seconds as running the motor without water can cause damage to the pump.
Once your pump has passed this short and sweet test and proven itself to function as intended, replace the lid immediately to prevent dirt and debris from falling in. You never know when an overlooked lid can lead to a clog when a spare tool, stray glove, or something worse finds its way into the pump.
Sump Pump Maintenance
For the most part, regular sump pump testing should be adequate maintenance for your sump pump. There are a few other tips that can assist in keeping your equipment in tip-top shape over the years:
- It’s recommended you keep a backup battery or handheld sump pump on hand just in case. Storms that bring heavy rain often cause power outages. Without power, your motor will not work and water will accumulate in the lower levels of your house. A handheld pump gives you a way to pump out water without power, but it only works if a human is present during the storm. A backup battery is a more foolproof way to prevent flooding if no one is around.
- Pay attention to the age of your pump. As mentioned, pumps over ten years old are more at risk of needing to be replaced, but pumps that run often may need to be replaced after as early as 5-7 years.
- Test your sump pump more often, potentially biweekly or monthly, after it hits ten years of age.
- Keep an extra backup pump on hand, just in case your pump fails.
- Be proactive when it comes to your sump pump. If your pump shows signs of wear and tear or slowing down in pumping water, replace it before it stops working. The last thing you want is to be in the basement during a big storm hastily changing out a sump pump before the water rises into your building.
Sump pumps are just one more piece of equipment in the long list of gear that keeps a building warm, dry and free from damage. Taking just five minutes to test your sump pump, especially prior to flood season can save you valuable time, money and effort in the long run.
Preparation like sump pump testing is the best defense against an unexpected disaster. Learn more about what you can do now to prevent business disruption later with ServiceMaster DSI’s first-of-its-kind Disaster Restoration partnership.
Stay safe, stay prepared. Click here to sign up for tips, resources and more information on Disaster Restoration partnerships with ServiceMaster DSI.