Roof leaks are problematic for everyone because it can start anywhere and spread everywhere in just a few hours. Within a short time, you can have an emergency on your hands, and chances are it isn’t during business hours.
To make matters worse, leaks occur from water penetrating through weakened building materials. At this point, taking immediate action is very important, especially when the storm hasn’t passed yet. So here are the steps to fixing a leak during a storm before a professional contractor arrives.
Fixing a roof leak during a storm involves all of the following steps:
- Remove the insulation from the attic
- Find the leak in the roof
- Make a temporary patch with a shingle and roofing tar
- Measure the distance of the leak, from the gable and from the ridge
What You Will Need:
- Gloves
- Sponge
- Plywood
- Bucket
- Roofing tar
- Putty knife
- Rubber-soled shoes
- Tape measure
Roof Safety Precautions
- Always use gloves and old clothing when handling roofing tar because it can get stuck to your skin and clothes.
- Always be extremely careful when going up onto the roof. Make sure the ladder is secured to the siding with ropes to prevent it from being blown over.
- Always use rubber-soled shoes when walking on the roof.
- Be careful where you step; some of the roofing materials may be slippery or even weak from previous storms.
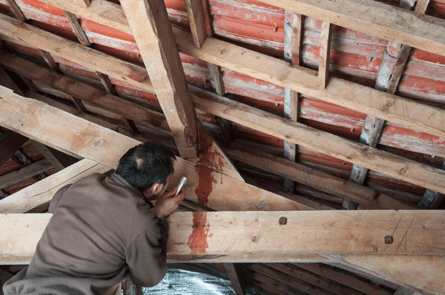
1. Remove the Insulation
If you can get into the attic, find and remove the wet insulation covering the leak. Use the sponge to soak up any condensation or a towel for excess water. Place the piece of plywood across the joists and the bucket on top of the joists to catch the water. Make sure not to place the bucket on the drywall because it can breakthrough as it fills with water.
2. Find the leak in the roof
If you look up into the roof, try to follow it back to where it entered. Be aware that this could be far from the point to which it dripped into the ceiling. It’s often that water travels along the rafter, which will make it easier to find in the roof, otherwise, it may follow the underside of the roof deck.
3. Make a temporary patch
Using the roofing tar or piece of plywood, you can make a roof patch. Use the putty knife to paste the roofing tar into the leak on the underside of the deck. Then place the plywood into the tar, pasting additional roofing tar around the plywood to cover the cracks.
4. Measure the distance of the leak
Use the tape measure to measure the distance of the leak from the ridge as well as from the gable. If it is still raining outside, do not go onto the roof. As soon as it stops, use the rubber-soled shoes and measuring tape to go up and measure the dimensions of the roof. Protect the undersides of the damaged shingles with additional roofing tar. Make sure to follow the safety precautions listed above.
Here’s how to cover a roof during an emergency situation:
- Use a plastic roof cover if you can’t find the exact location of the leak
- Unroll, measure, and cut the plastic
- Sandwich the plastic between two-by-fours
- Place the wood along the eaves of the roof
What You Will Need
- Rain gear
- Tape measure
- Rubber-soled shoes
- 6-mil polyethylene sheeting
- 4 two-by-fours, all 4 ft
- Staple gun and staples
- Nails Hammer
- Shingle
- Putty knife
- Roofing tar
- Bucket
- Plywood
- Sponge
1. Prepare the roof cover
If you are unable to reach the attic and can’t find the location of the leak, use a 4-ft roll of 6-mil polyethylene plastic.
2. Unroll, measure, and cut the plastic
Unroll but don’t unfold the plastic, measuring just enough to cover a section of the roof from the eave to the ridge. You will also want to allow at least another 4 ft, marking the spot and cutting it with a utility knife. Then unfold one of the plastic folds to make an 8 ft wide strip.
3. Sandwich the plastic between the two-by-fours
Roll one end of the plastic around one end of the 8-ft two-by-four and staple the plastic to the wood. Then cut another 8-ft two-by-four and nail it to the first piece, sandwiching the plastic between the wood.
4. Place the wood along the eaves of the roof
Carry the roof cover onto the roof and place it along the eaves. Stretch it along the ridge, covering the location of the leak. Staple the other end to an additional two-by-four while nailing another two-by-four to that one. Allow this pair of two-by-fours to hang down on the opposite side of the ridge.
Safety First
As much damage as leaks can cause, trying to patch or cover them can be extremely risky. If you’re not sure what you’re doing, it’s best to allow a professional to handle the work. This can prevent severe accidents as well as additional problems when the professionals do arrive. Otherwise, make sure to follow all of the safety precautions provided above.
Water Damage Restoration
Leaks can cause some significant water damage to the roof as well as drywall. While roofing contractors can fix the leak, you will also need another professional to repair the drywall. Again, if not treated right away, saturated drywall can spur mold growth, putting everyone on the property at risk of significant health issues.
But when it comes to responding right away, ServiceMaster of North Texas is available in the Dallas, TX area to restore water damage from roof leaks of all sizes. Whether in a residential or commercial building, our technicians are licensed and trained to respond immediately, dry out the moisture, and conduct the necessary repairs to prevent it from spreading any further. Following the job, we can also work with your insurance provider to ensure a smooth claims process.
Don’t hesitate to call ServiceMaster of North Texas for immediate water damage restoration as soon as the source of the damage has been removed. We are available 24/7 at (972) 840-8888.